Showing posts with label Cooking. Show all posts

Thursday, November 14, 2013

Creamy Chicken & Artichoke Tomato Soup

Since moving to the Quad Cities, we have been on a quest to find the best restaurants.  With no disrespect intended, we're not frequenting Chili's or Texas Roadhouse.  We are mostly looking for delicious, fresh, local, cute restaurants.  Recently, we found a new favorite, and we have lunch there almost every weekend.  It's called Cafe Indigo, and it's lauded as the Quad Cities' "best kept secret".  I'd have to agree since I think it's delicious, yet there is never anyone there.  Sad face. I hope they stay in business, so if you live in the QC, go to Cafe Indigo!

Anyway... Cafe Indigo makes two homemade soups a day, and they are always AMAZING.  One time, they had an artichoke, chicken, and tomato soup that was just to die for.  It was unique, and I've never had anything like it.  Since that day, they have never had it again, and I've been craving it!  I searched the web for a recipe, but I didn't find anything that was exactly right.  I ended up taking ideas from multiple recipes and making up my own version.  It tastes just like the original!  Although it has "creamy" in the title (and it's definitely creamy), it's very healthy as it contains only 1/4 cup of cream for the entire pot of soup.  The rest is chicken broth, skim milk, and veggies!  I love a good bowl of soup for lunch on a cold day, and this really satisfies! Try it out and let me know what you think!

Katie's Creamy Chicken & Artichoke Tomato Soup
6 servings

Ingredients:
2 T unsalted butter
1 cup yellow onion, diced (about half of a large onion)
3 celery stalks, chopped
1 carrot, chopped
3 cloves of garlic, chopped
3 T flour
3 cups chicken stock
1 cup skim milk
28 oz. can petite diced tomatoes, undrained
1 8 oz. can quartered artichoke hearts, drained
2 chicken breasts, cut into bite-sized pieces
1/2 t. red pepper flakes
1/4 cup heavy cream
shredded white cheddar cheese or Parmesan cheese (for topping)

Directions:
1.  Chop all of your veggies.

2.  Melt butter in a soup pot or dutch oven.  Cook onion, garlic, celery, and carrot in butter for 5-8 minutes on medium-high heat, until veggies are just tender.  Then, add flour and stir to coat.  Cook for one minute.


3.  Add chicken stock and milk, scraping the bottom of the pan for any browned bits.  Drain your artichoke hearts.


4.  Add tomatoes and artichokes to the pot and bring to a low boil / simmer.


5.  Add cut up chicken and red pepper flakes.  Let simmer for 15 - 30 minutes, until chicken is cooked and flavors meld.  Stir in the cream at the very end.


6.  Serve with grated white cheddar cheese or Parmesan. 


Enjoy!  This is a great soup for leftovers.  Add a salad and bread, and you've got dinner!  Thanks for the inspiration, Cafe Indigo!

Friday, March 8, 2013

Quinoa Breakfast Bowl

{Look!  A post that's not about my baby!}

Since I no longer have an excuse to eat donuts and pastries for breakfast (sigh), I'm returning to my healthy eating ways.  Lately, I've been obsessed with this easy, quick, healthy, and SUPER delicious quinoa breakfast bowl.  I saw the idea on Pinterest, and I knew I would love it.


This breakfast can be thrown together in a matter of minutes.  You'll get tons of protein from the quinoa and yogurt, antioxidants from the berries, and heart-healthy fats from the almonds and seeds.  Sweetened with a touch of honey, this is a chewy, crunchy, creamy, sweet, and tart breakfast.  I cook up a big batch of quinoa at the beginning of the week, and it keeps really well in the fridge for 4-5 days, making prep time super fast in the mornings.  The other great thing about it is that it's endlessly adaptable.  Personally, I think this is the best way, but you could sub in any other yogurt, nuts, seeds, and fruit that you like.  Here's how I make mine:


Red quinoa 
(you could use regular quinoa too, but I like red for breakfast)

Yogurt 
(your favorite kind will work, but I love Chobani fat free vanilla)

Berries 
(I prefer blackberries, but I've also made it with strawberries!)

Almonds 
(or your favorite nut)

Sunflower Seeds 
(unsalted!)

Honey
(or maple syrup or agave nectar)

Put it all together in a bowl.  Stir it up.  Enjoy.

Friday, October 5, 2012

Superb Stuffed Shells


To this pregnant lady (and maybe you too), there is nothing better than a big pan of cheesy, saucy, stuffed pasta shell goodness.  I saw this recipe in the latest issue of Everyday Food, and I immediately put it on my weekly menu.  What pushes this recipe over the top is the slice of pepperoni on each stuffed shell.  Also, this dish has a full serving of veggies since there in an entire zucchini grated into the filling.  Your kids (or husband) will never know.  The zucchini adds a great flavor and freshness to the dish.  I usually bypass recipes like this because stuffing things seems tedious and time consuming.  HOWEVER, this was ridiculously easy.  Truly.  I promise.  It was great for a weeknight, and I think it was special enough to serve for company.  Plus, the leftovers... divine!  (If you have any!)

Pepperoni Topped Stuffed Shells

Ricotta filling:
20 ounces part skim ricotta
1 medium grated zucchini
1/3 cup chopped fresh basil
1 large egg, beaten
kosher salt and pepper
pinch of crushed red pepper flakes
pinch of dried oregano

Shells:
3 cups marinara sauce, divided (I used Bertolli)
28 jumbo pasta shells, cooked according to package instructions
28 small pepperoni slices
1 cup shredded mozzarella cheese

Directions:
1.  Preheat oven to 400 degrees.

2.  In a medium bowl, combine ricotta, zucchini, basil, and egg.  Season with salt, pepper, crushed red pepper, and oregano.

3.  Spread 1 cup marinara in the bottom of a 9-by-13 baking dish.

4.  Fill each cooked and slightly cooled shell with 1 heaping tablespoon ricotta mixture and arrange in rows in baking dish.

5.  Top shells evenly with remaining marinara sauce.

6.  Place a pepperoni slice on top of each shell.  I used big pepperoni slices that I cut in quarters.

7.  Top shells with mozzarella.  Cover with foil and bake until bubbling (20 to 30 minutes).  Remove foil and broil until cheese is browned in spots, about 3 minutes.  Top with additional basil and serve.

YES, PLEASE.  
Make this tonight!

Thursday, August 16, 2012

Flatbread Fanatic

Confession:  I've had pizza for lunch for three days in a row.  I can't help it!  I've been craving tomato sauce and cheese (ie: pizza), and I found the PERFECT make-at-home flatbread pizza!  Since I've made it three times this week, I thought it was good enough to share with you.
Last week, I purchased these "flat out" multi-grain flatbreads from the grocery to make asian chicken wraps (also very good... maybe I'll post that later).  The nice people at the flatbread company had a little message for me on the package:  Makes amazing pizzas!  Well, I had never thought about using a flatbread for a pizza crust before, but I do LOVE thin crust pizza.  The thinner, the better!  So I decided to try it.  Plus, can you see how many calories a flatbread has?  100!!!  I know - it's like some kind of bakery sorcery.  But it's true.  You show me another pizza crust that has only 100 calories.

These flatbread pizzas are perfect for lunch because they are individually portioned and endlessly adaptable.  This would be really fun with kids since they could each make their own and pick their toppings.

First, crisp up the flatbread in the oven.  I used a pizza pan and a 400 degree oven.  I let it crisp up for about 4 minutes, turning once.  When it was nice and crisp, but not burned (duh), I put on the tomato sauce and Italian cheese blend.  You know how to make a pizza, right?  I prefer for my toppings to go all they way to the edge since a flatbread isn't really a crust.  Besides, be warned that any exposed flatbread will get very crispy (read: burnt) when you cook & broil it.  Just another reason to add more toppings :-)  I add a sprinkle of red pepper flakes and oregano at this point, just for funsies.


Next, top it off however you want.  I personally think thinly sliced mushrooms and thinly sliced salami (a la Campisi's) is ridiculously delicious, but you can obviously put whatever you want on your pizza... even if it isn't as good as mine.

Pop it back in the oven at 400 for another 4 minutes or so - until everything is all melty.

Then, (and this is key!) turn on the broiler and broil that baby up for just a minute or so.  This will give you the browned cheese and crispy toppings I crave.  Watch the pizza the entire time it's under the broiler.  I would cry for you if you burned it.

Take the pizza out, slice it into rectangular slices (again, a la Campisi's) and devour.  So.  So.  Good.

Sunday, June 10, 2012

A Better Burrito

Sometimes I see those ads on TV for Taco Bell burritos, and I almost (almost) want to eat one.   But then reason takes over, and I remember that those burritos are filled with cheap cheese, mystery meat, and fatty refried beans.  But what if... you could make a burrito at home that was delicious, cheap, quick, and healthy with all quality ingredients?  I've discovered the perfect make-at-home grilled burrito, and I'm here to tell you it's one of the best lunches I've ever made.

I saw the recipe in May's Cooking Light, and I knew I had to try it ASAP.  The great part about this burrito is that you can make a big batch of the filling and keep it in the fridge.   Then I had burritos for days on end with less than five minutes prep time!   If you're a Mexican lover like me, you must try these.

Chicken & Black Bean Grilled Burritos (adapted from Cooking Light)
(makes 3-4 burritos)
2 boneless, skinless chicken breasts, chopped in bite size pieces
1 c. chopped yellow onion
1 T. chili powder
1/2 T. cumin
1/4 t. salt
1/8 t. ground pepper
2 t. canola oil
1 can Bush's low sodium black beans, drained and rinsed
2 T. chopped pickled jalapenos (optional - will add a little heat)
2 garlic cloves, crushed
flour tortillas (soft taco size - I like Mission)
shredded pepper jack cheese
cooking spray
salsa (for dipping)
light sour cream (for dipping)

Combine cut up chicken, chopped onion, and all spices (chili powder through pepper) in a bowl.  Toss to combine.  Pre-heat a medium skillet over medium-high heat.  Add chicken and onion mixture and saute until tender (about 8 - 10 minutes).  Stir occasionally.  A delectable sauce will begin to form.  Then add in black beans, garlic, and jalapenos and cook until warmed, about 2 minutes.
In the center of a tortilla, spoon about 1/4 of the chicken mixture.  Don't be skimpy.  You'll be able to fold it over - promise.  I've been to Chipotle enough to know that you can fit a heck of a lot in a burrito.
Top each burrito with pepper jack cheese (or Monterey jack or cheddar... whatever floats your boat, but I recommend pepper jack.)  I make it a point never to measure cheese.  Paula Deen would be proud.
Next, channel your inner burrito maker and roll that baby up!  I like to fold the shorter sides up first, laying the tortilla flat against the chicken mixture.  Then, roll the bottom towards the top (away from you) tucking in the filling as you go so it stays tight.
Carefully spray both sides of the burrito with cooking spray and gently place SEAM SIDE DOWN in a skillet or griddle over medium high heat.  If you put the seam side down first, the cheese and heat will keep everything glued together.  When that side is browned (about 2 minutes), flip it over and brown the other side.
Remove from skillet, carefully cut in half, and serve with salsa and sour cream.  Repeat daily.  Trust me, you want this!!  It's also husband approved.

Friday, April 27, 2012

Overnight Oatmeal


If you've been on Pinterest for more than five minutes (and we all know I have), you have undoubtedly seen at least 100 pins for overnight oatmeal. I've always loved oatmeal.  I don't really love the super sweet instant oatmeal packets, but the regular oatmeal is a bit of a time commitment to make in the morning.  Still, it seems like everyone sings the health benefits of oatmeal, so I try to eat it at least a few times a week.  I was intrigued by this "overnight oatmeal" that everyone was buzzing about on Pinterest.  I scoured a few blogs with different versions.  Some versions people complained were too chewy or made them nauseous.  Um, no thanks.  Then I found this one recipe from a blogger who claimed that she made many versions, and this was the best. I liked all of the ingredients, so I figured I'd give it a try. 

Oh My.  It is so good.  Every night now, I make the three minute investment in this oatmeal, and come morning, I am really happy I did.  No cooking required!  I love that this overnight oatmeal is not too soggy and not too chewy.  The texture is perfect.  Also, it's only slightly sweet, which I love.  Finally, the fruit stays firm, and the coconut adds a little crunch.  If you haven't tried overnight oatmeal, I highly recommend this recipe!  I'm still enjoying it, but I may play around with some variations in the future.  The sky is the limit - you could add any milk, fruit, nut, or add-in you want!  Most people on Pinterest make their overnight oatmeal in cute-sy little Mason jars and sometimes they put little bows on them.  I mean, really?  Sorry, I don't have those.  I just have Ziplock plastic containers.  It tastes just as good.  Keepin' it real.

Mango-Coconut Overnight Oatmeal
In a resealable container, mix:

3/4 cup rolled oats (regular, not quick)
3/4 cup unsweetened almond milk
2 T. shredded sweetened coconut
1 t. agave nectar (add more if you like it sweeter)
1 chopped mango (the smaller champagne mangoes are the best)

Seal the container and place it in the refrigerator overnight.  In the morning, stir and eat!  This morning I threw a handful of blueberries on top.  Yum!!  I wake up looking forward to getting this out of the refrigerator!

Tuesday, April 17, 2012

Best Salad Ever

Hold the presses.  Close Pinterest.  Turn off Food Network.  Alert Facebook. 

You can stop searching for the perfect salad recipe.
I have found it.  
That's right:  This is the best salad in the entire world!

I may be a little biased, but I've made quite a few salads in my day, and this one is officially the best.  It is tangy, spicy, savory, crunchy, chewy, satisfying, healthy, easy, and beautiful.  I know there are plenty of versions of this salad out there and some you can even get at Wendy's.  I'm pretty sure that this one is better, and you feel good about what's in it when you make it yourself.

I saw a similar recipe on Pinterest, and I adapted it.  I've eaten this for lunch two days now, and it will be a lunch staple from now on.  It's ridiculously easy, and you can cook up the chicken & pasta at the beginning of the week to keep in the fridge so you can throw together a salad every day in less than 5 minutes.  Here's how.

Katie's Chinese Chicken Salad


In a large bowl, toss together the following.  It's your salad, so you get to decide how much of each component you want.
  • Sliced romaine (I like to slice mine myself rather than using those huge bagged leaves)
  • Cooked pasta (I used gemelli - you can use anything you have  on hand)
  • Diced broiled chicken breast (simply broiled with olive oil, salt, & pepper)
  • Sliced green onions
  • Diced cucumber
  • Crispy wonton strips (found bagged in the produce section)
  • Sliced almonds
  • Jarred mandarin orange segments (opt for the no sugar added kind)

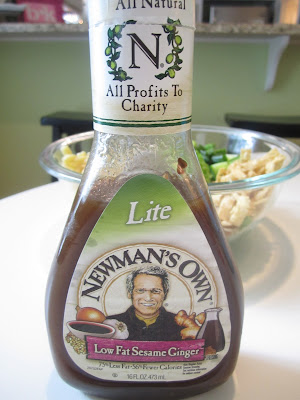
Then, add the best salad dressing ever (Newman's Own Lite Low Fat Sesame Ginger)

To finish it off, sprinkle some sesame seeds on top. Why not?  
Join me in salad heaven!!!  So good!!

Wednesday, April 11, 2012

Easter Weekend

This weekend, we had Brent's parents in town to celebrate his birthday and visit Durham.  More on Brent's birthday later!  We went to all of our favorite Durham restaurants:  Magnolia Grill, Rue Cler, Foster's Market, Guglhuph, and Bull City Burger!  We walked on the Wa-Duke trail, walked around the neighborhood, and hit up all the antique shops and fun stores.  The weather has been beautiful, so we enjoyed many evenings on the porch with wine and nights around the fire pit in the backyard.    We had a laid back Easter, worshipping at Summit Church and then cooking a Southern spring feast for dinner.  We're so glad Vicky & Terry got to take a quick vacation and join us!

Walking on the Wa-Duke 

Easter Dinner!

Chicken stuffed with spring onions and goat cheese {from Cooking Light recipe here}
Risotto with sauteed asparagus {from my own Nordstrom's inspired recipe here}
Cornbread Madeleines {from Southern Living recipe here}
side note:  These were INCREDIBLE.  So simple, yet so amazing.  Southern Living claims you will say "lawdamercy!" when you eat these, and I'm here to tell you it's true.   This recipe is worth buying a madeleine pan.
Citrus & Avocado Salad {from Everyday Food recipe here}
This was a delicious spring salad, and the citrus dressing (not shown) was light and lovely.
Carrot Cake {from Cooking Light recipe here}
Y'all, this carrot cake was divine.  We've been eating it for three days now (oops), and it keeps getting better somehow.  This is one of Brent's favorite cakes, so I made one in honor of his birthday.  Believe it or not, this was a Cooking Light "recipe makeover" where they took a 1,200 calorie slice of cake and whittled it down to below 300.  I seriously can't imagine it being any tastier.
Hope you had a blessed Easter!


Wednesday, March 28, 2012

Summer Sneak Peek

Although it got down to 37 degrees in Durham two nights ago, I was really craving a taste of summer.  With a little pre-planning, this meal can come together in 15 minutes or less at dinner time.  I made it as a light dinner before going to my Bible study on Monday night.  It's a light, flavorful meal, and it was perfect for me.  However, Brent claimed he had to eat 3 ice cream sandwiches afterward, so you  may want to include some bread or ice cream for your man :-)  In the morning, marinate your chicken in a large Ziploc bag.  Also in the morning, chop up fruit and make the fruit salad.  Stash everything in the fridge to get all yummy.  Dinner will come together in no time when you just cook the chicken & quinoa.
Lime Chicken
{Mom's recipe}
Pound chicken breasts thin, sprinkle with salt and pepper, and add them to a Ziploc bag.  Marinate with soy sauce, Worcestershire sauce, and lime juice.  I refuse to measure ingredients for marinades, so I encourage you to do the same.  I added soy sauce, Worcestershire, and lime juice in an approximate 2:1:1 ratio.  At dinner time, saute in a skillet over medium heat approximately 6 minutes per side or until cooked through.  Slice thinly.  If you have a grill, more power to ya, but I just used my lowly skillet, and I still got lovely "grill" marks.

Savory Tropical Fruit Salad
{Adapted from Cooking Light}
In a bowl, combine:
1 mango, diced
2 cups pineapple, diced
2 kiwis, diced
1 orange, diced
2 T. red onions, diced
2 T. cilantro, chopped
half of a small jalapeno, diced
1 t. ground cumin
pinch of salt
pinch of pepper

Cilantro Lime Quinoa
{Adapted from Pinterest}
Cook quinoa according to package directions.  I cooked 1 cup of quinoa for two people.
When cooked, stir in lime juice, chopped cilantro, and salt to taste.

Sunday, March 25, 2012

Easy Eataly

This past summer, Brent and I discovered Mario Batali's "Eataly" in New York City.  We had a fabulous dinner there.  Brent got a pasta dish that was so good, we are still talking about it.   The odd thing is that it was just about the most simple, basic pasta dish EVER.  It was amazingly well-executed with high quality ingredients.  It was a penne pasta with marinara, fresh mozzarella, and fresh basil.  There was something about the sweet marinara, creamy mozzarella that got kind of melty, and fresh, fragrant basil that was simple perfection.  It's a meatless main dish, and I'm kind of embarrassed about how easy it is.  This is one of our go-to meals when we are feeling kind of lazy but still want something good.  Now, I'm quite sure Mario whips up his marinara sauce from scratch, but I find Newman's Own jarred sauce saves me approximately 3 hours.  Last night was stormy here in Durham, and this was the perfect dinner to eat curled up on the couch watching DVR-ed "Selling New York".  Add a bowl of salad and some garlic bread, and you've got a meal.  Try it this week!
Easy Eataly Pasta
Good penne rigate
Good jarred marinara (we like Newman's Own)
FRESH mozzarella cut into small chunks
FRESH basil cut into thin strips
Optional:  Crushed red pepper flakes and fresh Parmesan

Boil your penne according to directions on box.  While pasta is cooking, cut up your mozzarella and basil.  Drink wine.  Drain in colander & return pasta to pan.  Pour in marinara sauce and cook on low for just a few minutes - you really want the sauce to warm up and soak in.  Serve pasta in bowls and let each person add as much mozzarella, basil, red pepper flakes, and/or Parmesan they desire.  Stir it all up, let the mozzarella get all warm and melty, and enjoy!


Wednesday, February 15, 2012

Party of Two

This Valentines, we decided to avoid the crowds and stay home!  Actually, we went out for dinner on the 13th, then stayed in on the 14th.  We both agreed that we liked our night at home better - the atmosphere was better, the food was better, and the price was, well... a lot better!  We opted for a "French Bistro" menu which was simple and casual but still special enough for Valentines.
 Bistro Menu:
  • White wine steamed mussels
  • Herb roasted chicken
  • Pommes Frites
  • Molten chocolate cakes
White Wine Steamed Mussels

Mussels sound complicated, but they are quite possibly one of the easiest things I've cooked.  Plus, a two pound bag of mussels was only $5.99 at Whole Foods!
1-2 pounds of mussels
2 finely chopped shallots
2-3 chopped garlic cloves
1 cup dry white wine
thyme or chives for garnish

Discard any broken or open mussels.  Rinse under cold water.  Saute garlic and shallots in olive oil in a large skillet for 2-3 minutes over medium heat.  Add wine and bring to a simmer.  Add mussels and cover, letting steam for 5-7 minutes until all mussels open.  Discard any mussles that do NOT open.  Sprinkle mussels with thyme or chives and kosher salt.  Serve in a bowl with broth and crusty bread, if desired.
Herb Roasted Chicken

skin on, bone-in chicken breasts and leg pieces (I used one breast and one leg)
1 tablespoon fresh chopped basil
1 tablespoon fresh chopped thyme
1 tablespoon fresh chopped rosemary
1/4 teaspoon salt
2 teaspoons olive oil
fresh cracked pepper

Preheat oven to 350.  Combine all herbs, olive oil, salt, & pepper in a small bowl.  Rinse chicken & pat dry.  Loosen skin and run herb mixture under skin.  Drizzle chicken tops with olive oil & sprinkle with kosher salt.  Roast for 45 minutes at 350 degrees.  Then increase the oven to 450 degrees and roast for 30 additional minutes.
 
Pommes Frites

2-3 Yukon gold potatoes (for 2 people)
2 teaspoons olive oil
1 tablespoon fresh chopped thyme
2 teaspoons garlic salt

Cut potatoes into thin matchsticks.  In a Ziploc bag, toss potatoes with olive oil, thyme, and garlic salt.  Spread in a single layer on a baking sheet coated with cooking spray.  Do not cover the baking sheet with foil - fries will stick.  Bake at 450 degrees for 20 - 30 minutes, tossing once during cooking with a spatula. If you're making these with the chicken, simply add them to the oven for the last 30 minutes of the chicken's cooking time when the chicken is cooking at 450 as well.


Molten Chocolate Cakes
{My mom's recipe}

20 unwrapped dove dark chocolate pieces
6 tablespoons butter
1/4 cup sugar
2 eggs
1/4 cup flour

Preheat oven to 400 degrees.  Spray 4 ramekin dishes with cooking spray.  Melt chocolate, butter, and sugar over low heat.  Whisk in eggs.  Stir in flour and mix well.  Pour evenly into 4 prepared dishes and place dishes on a baking sheet.  Bake 10 - 13 minutes.  Serve warm with vanilla ice cream and/or fruit.
 
Site Design by Designer Blogs